
Product Overview
Mobile Service Technician (MST) is a mobile product that enables a Technician to clock on/off POS jobs using a tablet device, via an internet browser (web app).
Mobile Service Technician Operation
Login
The login to MST is controlled by POS Operators and WL Resources. A POS Operator record is required, linked to a corresponding WL Resource record using the GB_users field – this must be the same in POS and WL to make the link. The POS Operator record must be created with a password (see further down this section for added detail). Every Technician requires a GB user record - however they do not require an operating system login - they do not login with Kclient
Creating the GB User Record
System Utilities / Management Menu / User Details
Load any existing user (preferably another Technician)- then Insert / Copy (like you did above for the GB user record)
Update the Name / Position / Email
Enter a new UserID
The standard format for user ID's is firstname + first letter of surname (all in lower case)
eg Joe Bloggs = joeb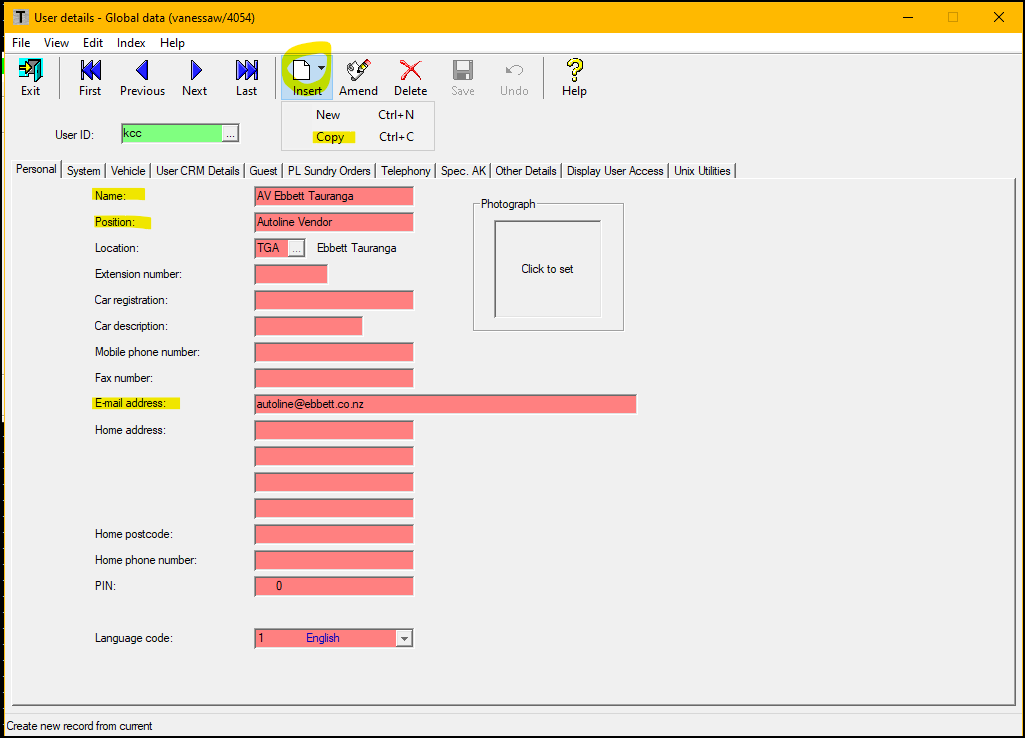
POS Operator
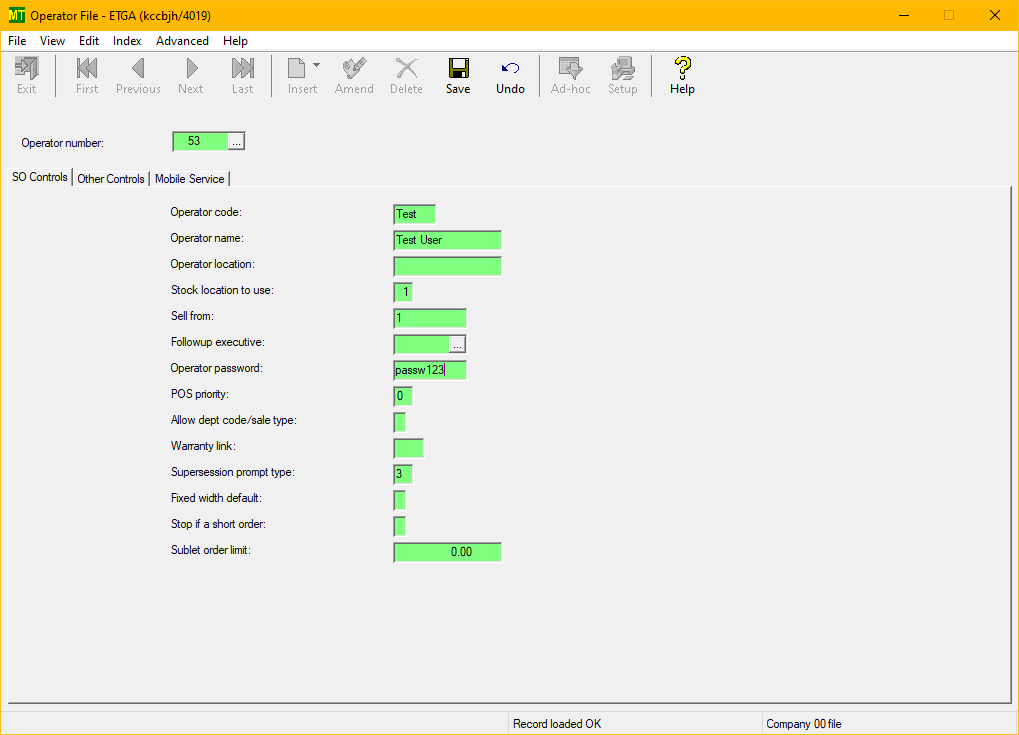
Point-of-sale / Miscellaneous Options / POS Operators
First find a free operator number.
Click the ellipse next to the Operator Number to see all the existing operator numbers. (find an unused one - or add them all to the end of existing)
Load an existing user - then Insert / Copy
Enter that unused operator number you discovered above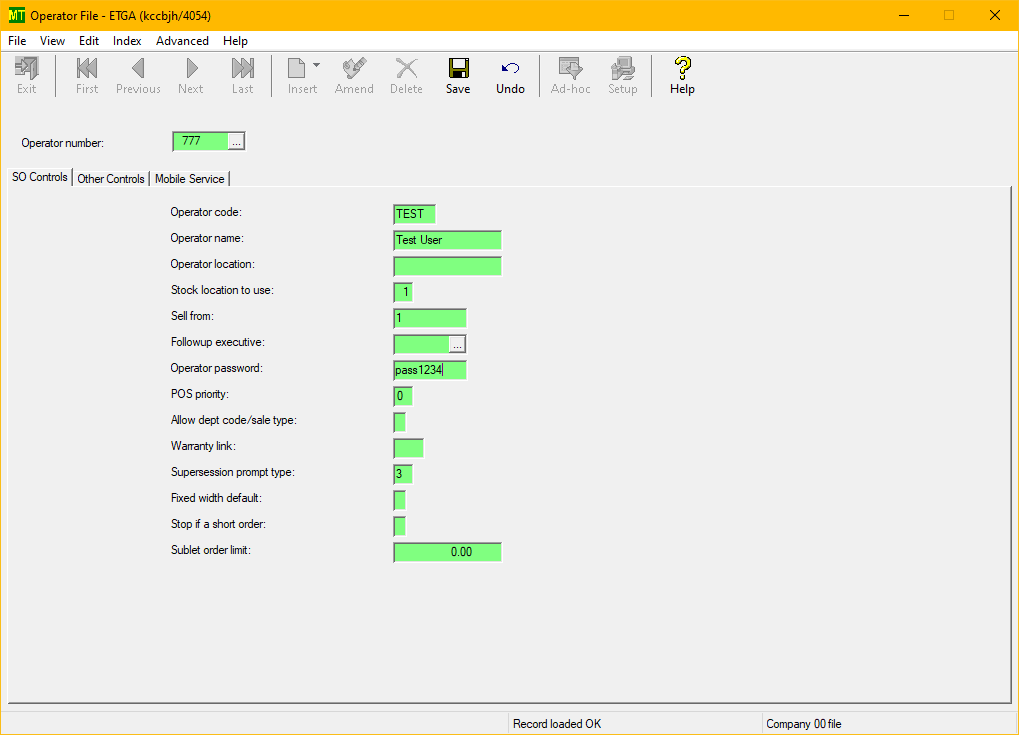
The Operator Code will be the users login NOT the Operator Number
The Operator password will be the users password (password restrictions below)
Note: – Only one Technician clocking browser session can be used on a single device.
The password required to login is the POS Operator password as used for VHC Touch logins and follows the same rules:
The POS Operator code can remain as a 2 character code (4 suggested). The password must satisfy these requirements:
- Passwords must be a minimum length of 8 characters
- Passwords must contain at least 1 alphabetic character
- Passwords must contain at least 1 numeric character
- Passwords may contain a special character(s)
- Passwords cannot have 4 or more repeating characters (AAAA)
- Passwords must be case sensitive
- Passwords must not be allowed to be equivalent the user ID
- Application should prevent the use of the last 4 passwords (i.e. history)
- Application should prevent the Hint from being the same as the password
- Passwords may not be changed, by the user, more than once during a 24 hour period
It’s important to note that the password does not expire.
Other controls tab
Enter the GB userid you created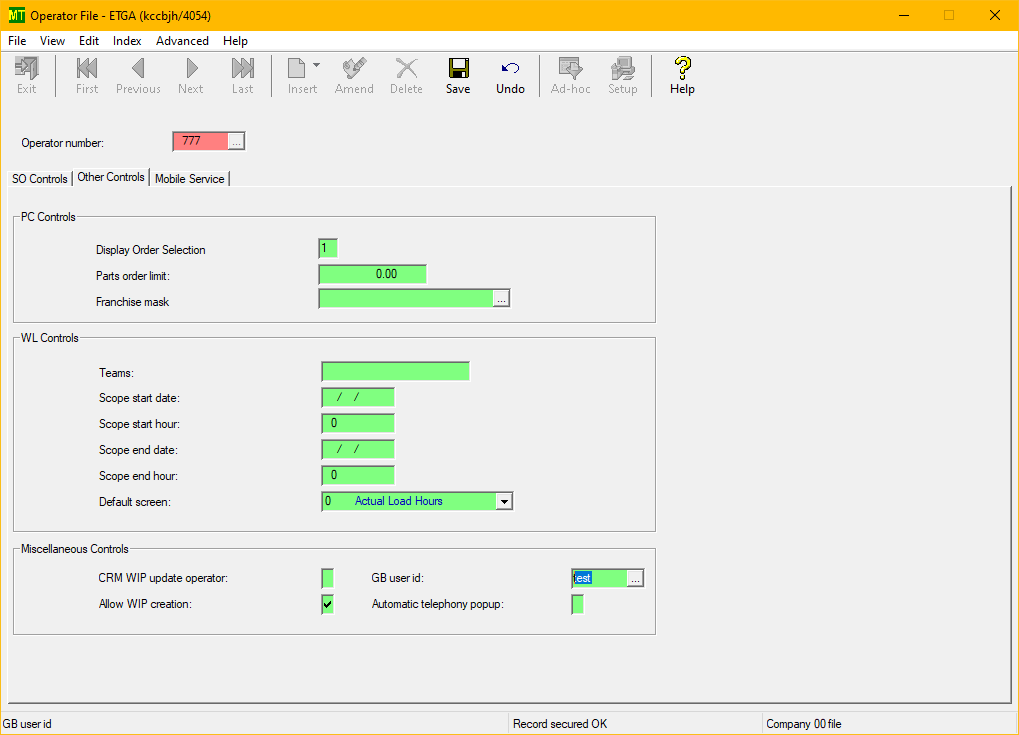
WL Resources
This would normally already exist from using standard time clocking
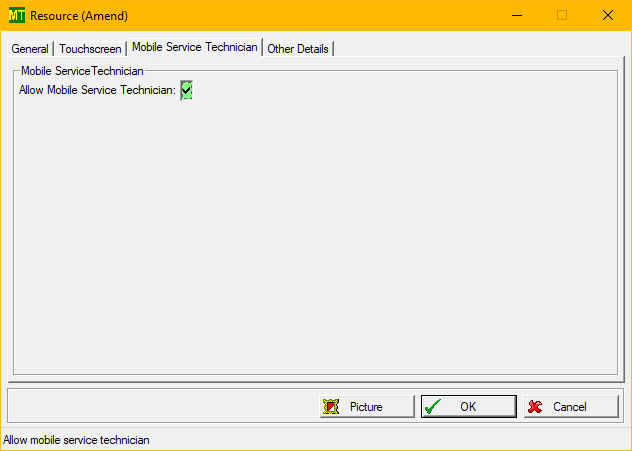
Workshop Loading / Resources
Enter GB User id (created earlier)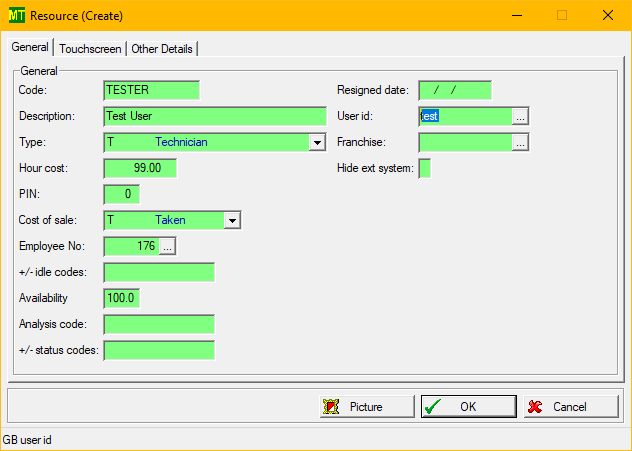
Allow Mobile Service Technician - Tick Box
POS / Miscellaneous Options
Back on the GB user record - Guest tab
You can enter the POS operator number you created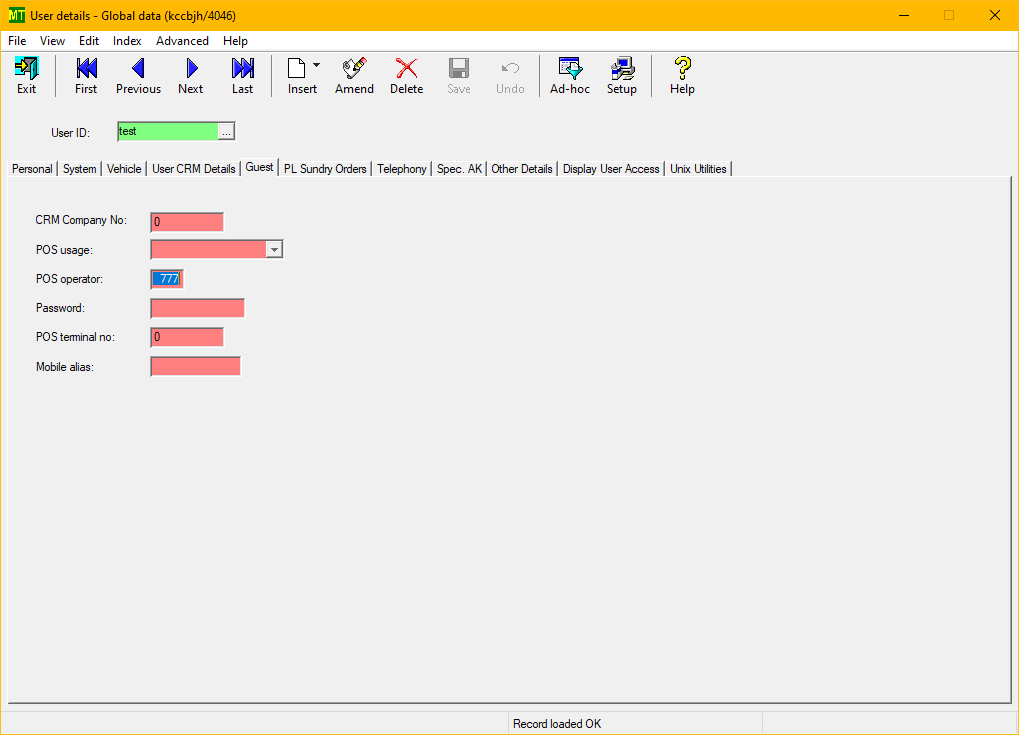
Log-Out
To log out of the app completely will in effect clock the Technician out and no more clock entries will occur. The button to log out is titled ‘Sign Out’ and is only found on the top left of the WIP list screen. If selected, the Technician must confirm by selecting ‘Yes’ to the confirmation message, which will then exit the app and clock out.
If this log out denotes the end of the day, it is also good practice to log out completely of the mobile apps using the ‘Log out’ button found on the top left of the screen. Using this will then display the Login screen on confirmation – see section 5.1 of this document.
For testing if you use an Incognito/InPrivate Window - you can close the tab - to leave the tech clocked in. Then open a new Incognito/InPrivate Window to login as someone different (If you left the Incognito tab open it will log back in as that same User.
Application use
When logged into the MST app the Technician is clocked-in and an entry to this effect is made into the clock file in the DMS. The overall app use is synchronised with the DMS and the WIP and clock file is updated as if normal WL clocking is utilised.
Clocking-in
This terminology refers to when a Technician arrives at the workshop and is available for work. Logging into the MST app is in effect carrying out this operation – clocking-in. As a default the system will use the ‘Last resort idle code’ which is setup in WL system parameters. However this can be changed if required to a different idle code using the button at the top of the screen on the app containing the idle code text. Only idle codes that are allowed for this resource are available, checking the ‘+/- idle codes’ setting in the corresponding WL resource record. The current idle description text is also displayed on the top header banner along with the Technicians login name.
The top header banner also contains two buttons:
A ‘Sign-out’ button which clocks the Technician out completely (used when the Technician leaves work and is not clocked to a job or idle).
An ‘About’ button which shows details of the Client and Server details for support purposes.
The current time is displayed in 24hr mode and the time used in the device time.
A ‘Refresh’ button is a manual operation that can be selected to update the app so that it is in line with the DMS. The automatic refresh is determined by the WL System Parameter, ‘Seconds to refresh’. It is recommended that this is set to at least 60 seconds, but no more than 300.
The screen is divided into 4 main sections with a record count, separated with header bars:
ASSIGNED – This section shows all jobs that are assigned to the Technician for today using the date-in date on the WIP header.
UNASSIGNED – This section shows all jobs that are not assigned to any Technician for today using the date-in date on the WIP header.
ASSIST – This section shows all jobs that are currently being worked on by other Technicians.
OTHER TECHNICIANS – The section shows all jobs that are assigned to other Technicians
Any of the jobs on the entire list can be selected by tapping on the record. A filter is available where a registration or WIP number [or part of] can be entered to find display results. This is particularly useful to go straight to a particular WIP.
By selecting a job, the screen will show the details relating to this repair, and the next part of the clocking process can be carried out.
Selecting tasks and clocking-on
Once a job is selected, the details are presented in the top header bar which will show WIP number, Vehicle registration number and vehicle description. A ‘Back’ button is available to go back to the previous WIP selection screen if required.
The WIP details are also displayed in the top section titled ‘WIP Details’ – tapping on this will collapse this section and tapping again will expand. Below the WIP Details are two buttons:
Clocking – This is the default selection, and is therefore highlighted on entry to the screen. With this button highlighted and selected, the lines displayed are the labour lines from the WIP that the logged-in Technician has the skill to carry out – as per normal clocking functionality. Each line will show the time allowed in decimal hours along with the full labour line text. Tapping anywhere on the line will select it for clocking however a ‘Select All’ button is available which will tick on all lines displayed.
History – Tapping on this button will highlight it and display the most recent 10 Service History records below it. Each history record will show the date, odometer reading and details relating, along with a down-arrow if the history item is drillable. Tapping on a drillable history item will display the Parts and Labour lines breakdown and show the detail of Part number/RTS code, Description and Parts quantity/Allowed time. Tapping again will collapse the detail to display all history lines once more.
To make a clocking, ensure that the ‘Clocking’ button is highlighted. Either select the lines to clock or tap the ‘Select All’. When the correct lines have been selected, tap on the ‘Clock On’ button which will now be enabled when a line or lines have been selected to clock to. When Clock On is selected, a confirmation message will appear – selecting ‘Yes’ will continue with the clocking and `selecting ‘No’ will return back to the previous selection screen.
Note: - Inactivity whilst in this screen for 60 seconds will refresh back to the WIP list.
Clocked onto a job
When the clocking is confirmed, the screen will change to show what the Technician is currently clocked to, with corresponding detail. The WIP details and Service History are available in collapsed top sections which is the same detail to that what is available in the previous screen. A third section which is shown as expanded on entry to the screen is ‘Clocked Lines’ which also displays a count of all current clocked lines. Tapping this section will collapse and another tap will expand. The labour lines displayed will show the labour line text along with the allowed time.
In the main section of the screen is 5 prominent lines of clock detail as follows:
- Current time: - This is the current physical time, dictated by the device
- Started: - This is the physical time that the job was clocked to
- Allowed: - This is the total allowed time of all the labour lines that have been clocked to, displayed in hours and minutes (NOT decimal hours)
- Elapsed: - This is the amount of time that has previously been clocked onto the lines that are currently clocked to, displayed in hours and minutes (NOT decimal hours). If this line is blue text and shown as underlined, it can be drilled by tapping the line. This will then display a breakdown of time previously clocked to each line that is currently clocked. I f there is no time previously clocked this line will not be shown as drillable.
- Remaining: - This is the amount of time remaining on all of the lines that have been clocked to; calculated by deducting the total elapsed time from the total allowed. Once the remaining time is <= 5 minutes, the time text is displayed in red font. The time is displayed in hours and minutes. (NOT decimal hours).
There are 3 other buttons available on this screen:
- Pause – This is a quick method to clock off the current job to an idle code. Selecting the Pause button will prompt for an idle code input from a drop-down list (the idle codes offered will reflect what the Technician has access to as per WL Resources). Once the idle code is selected, the Technician is clocked to this idle code and a ‘Resume’ button only will; be displayed. By tapping resume, the Technician will resume all of the tasks previously clocked on to.
Vehicle Health Check – This is available and the button is titled as this if a Vehicle Health Check has not been completed on the WIP that is clocked to. Tapping on the button will launch full mobile VHC recording for the Technician to record the VHC, or resume a check if in progress (See the VHC Touch user guide for more details). Once completed, the Technician will return to the screen showing current clocking detail. If a VHC has been completed for the WIP currently clocked to, the button is unavailable showing a title of ‘Vehicle Health Check Completed’.
Finish – This button is used to clock-off the current clocked jobs.
Clocking-off
When a Technician is clocked to a job, the screen will show a ‘Finish’ button, highlighted in blue towards the bottom of the screen. Selecting this will allow the Technician to change the current clocking by ending this and beginning another.
By selecting the Finish option, the screen will display the job tasks to determine the status that is relevant. If no selection is made when in the Finish screen, the app will refresh back to the current clocked tasks after 60 seconds. The Finish screen is divided into 2 sections:
- Currently Clocked Tasks – These are all of the tasks that were clocked onto when the job began. Each line is presented here for the Technician to either Complete, Suspend or set to No Work.
Note: – The Awaiting Parts and Awaiting Authorisation statuses are not included in the MST app.
- Complete – This will set this task as completed and set the line to ‘C’ status on the WIP as per normal clock functionality. If setting to this status and clocking off, the task will no longer be available to clock to.
- Suspend – This setting will set the line to ‘L’ status on the WIP, which is awaiting labour; again, normal clocking functionality. By using this status, a Technician is able to clock back onto the line again to proceed with the work.
- No Work – The status will remain unchanged in the WIP for this line.
The default clock off status for tasks currently clocked can be determined using a WL System parameter (Optional functionality tab) called ‘Default clock status’. This parameter can contain one of three settings:
- Blank – This indicates that nothing is set as a default and the Technician must select an status manually
- ‘C’ Complete – The default status is set to ‘Complete’
- ‘L’ Awaiting labour – The default status is set to ‘Suspend’
Note: – The parameter is only used for the MST app and does not influence the default setting using any other clocking method.
The default status can be changed if required before clocking off.
- All Other Tasks – These are all other tasks contained on the WIP that the Technician has the skill to do. The tasks could have been added to the WIP whilst the Technician was clocked, giving the opportunity to complete or suspend any of these tasks if any work has been done on them (as per normal clock functionality). The default status for these tasks is ‘No Work’ and can be changed if required. There is no parameter to set this status and is hard coded to be ‘No Work’.
If required there are buttons to set all lines, currently clocked and other, to ‘Complete All’ or ‘Suspend All’.
Once all of the tasks presented have been checked to ensure the correct statuses, the ‘Clock Off’ button can be selected. In doing so will present a confirmation and by selecting ‘Yes’ to confirm will make the clocking accordingly, updating the tasks back to the WIP. Selecting ‘No’ will return back to the return back to the Finish screen for status selection. If all of the jobs have been completed, the app will return to the WIP list on clocking off – the default idle code is automatically selected and the next job can be selected. If there are more tasks on the repair order to clock, the app will return to the task clocking screen – see section 6.3.2 of this document for task clocking screen functionality.
Support Information
Internal Document - https://learnsystime.auxosoftware.com/a/solutions/articles/51000531611?portalId=51000016642
MST Mobile Technician setup